
Eliminating Input Lag: A Pro’s Guide to Lag-Free Gaming in Counter-Strike 2
14 September 2023
In the fast-paced world of competitive gaming, every millisecond counts. Whether you're a seasoned Counter-Strike…
In CSGO, there are numerous maps – and becoming a good player is about understanding each map thoroughly. In this article, we are going to look at how to successfully conquer the Vertigo map.
The Vertigo map is one of the oldest maps in the history of the game, first being available in CS 1.6 and having travelled through time along with the Counter-Strike game. Having said that, this doesn’t mean that it has been without its ups and downs – with the popularity of the map growing – and falling at different times. It was even removed at one point, only to be updated and thrown back into the mix.
The map was originally created back in 1999 by Chris Auty. As such, this is one of the oldest ones in the game. However, this is not one of the most popular maps. It did, however, stand the test of time and made its way into the CSGO game in 2012 after undergoing an update that improved a handful of textures and structures to the map.
Unfortunately, despite these amendments, the game still failed to capture players’ imaginations and in 2017 it was removed from the game for its lack of popularity – and being unplayed in competitive matches. However, two years later it returned and started making new waves, in both standard and competitive Counter-Strike Global Offensive matches.
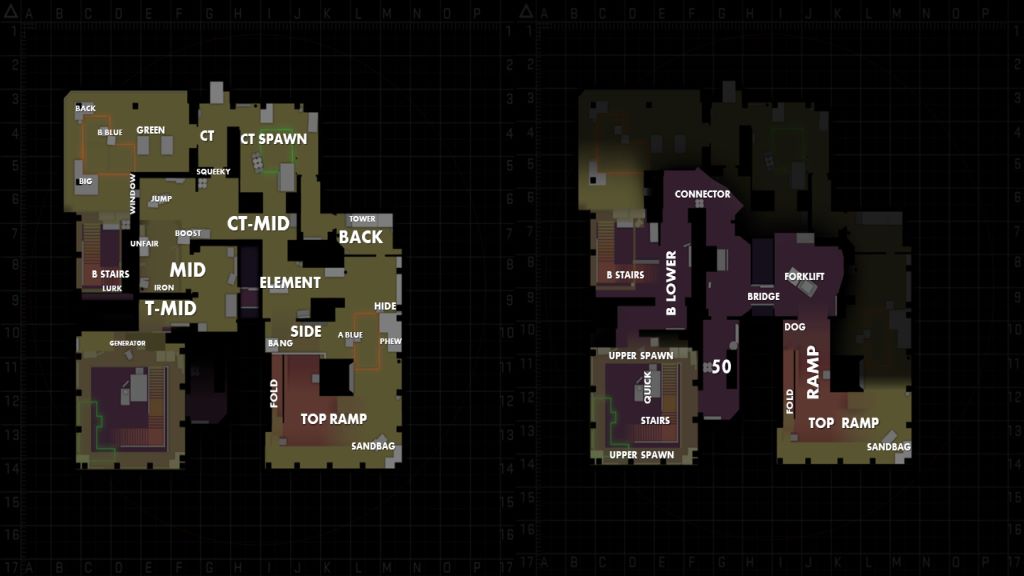
Compared to the other Counter-Strike GO maps, the Vertigo map has a very organised layout order along with a callout order that is very straightforward, making it easy to learn and understand. There are plenty of open spaces, which is perfect for huge fights and battles, but there are also numerous narrow corridors to allow players to move across the map quietly.
The Vertigo map is divided into two floors, which are practically the same in terms of wide-open areas, places to hide and narrow corridors etc.
Use Promo Code WELCOME for a 100% deposit bonus.
100% first deposit bonus which means that we will add an extra 100% to the amount you deposit into your player account. The maximum amount for the bonus is €550 and the rollover requirement is x10 for betting and x30 for casino (qualified deposited amount + bonus).
There are a handful of hotspots and main areas on the Vertigo map that you will need to master and remember if you want to win on this map. That’s what we are going to look at now.
When you open up the Vertigo map, you will notice that Bombsite can be found at the bottom left-hand corner on the top floor of the map. This is the location that is the furthest from the Terrorist Side which means forces the attacking team to make their way through a lot of tricky and high-risk areas to get to it. At first glance, this seems one-sided, however, it’s not easy for the Defenders to access either. They will need to get through the stairs heading towards the mid all the way over to Bombsite A. They could also opt to go under the Ramp, which is another way to get there.
The area around the place that you need to plane the bomb is reasonably out in the open and there are just a few places a player can take cover. However, if you use the sandbags as cover, or else hide behind a few holes or doorways, then you may just be able to escape the enemy and take them down.
Trying to defend Bombsite A on the map is a trickier proposition than defending Bombsite B because Defenders have to go all out to get control of Mid. If they do this successfully, then the Attackers will find it difficult to push through.
As soon as the Defenders get control of Mid, it will force the Attackers to come out from underground. This won’t be easy. In either case, you can’t always guarantee a successful defence on the Vertigo map. One of the reasons behind this is because it’s too difficult to get full control of the overhead Ramp. This is very easy to retake and turn it all around in an instant. The best move is to lob Molotovs on the Ramp, which will prevent the Attackers from being able to use it.
If you are against an enemy that doesn’t know how to defend Bombsite A, then this is one of the most straightforward places to attack on the Vertigo map. Should you choose to Rush A then there’s a high chance that you may be able to quickly overcome your enemy and get a round win. The main reason behind this is the fact that it’s too hard for Defenders to fully take control of the Ramp area.
Use Promo Code WELCOME for a 100% deposit bonus.
100% first deposit bonus which means that we will add an extra 100% to the amount you deposit into your player account. The maximum amount for the bonus is €550 and the rollover requirement is x10 for betting and x30 for casino (qualified deposited amount + bonus).
Whoever does get control of the Bombsite A area will have the easiest access to Mid – another important location to try and control. So, ideally, you will need to split your team and send over a couple of players to fight for control over mid, while the rest of your team is pushing through towards planting a bomb at Bombsite A.
As soon as you start forcing through to Site A, you need to throw a smoke at the right-hand side of the ramp and look around at every angle to make sure that no one is covering them from above. If you spot an enemy, kill. This is a top tip as you will have a good vision up the Ramp, whereas the enemy will hardly be able to see you below because it will be a lot darker where they are. The idea here is to block your enemy’s vision to help you get further and help you to overpower them.
Bombsite B can be found on the opposite side of Bombsite A on the Vertigo map. This area has more hiding places and objects that you can use. Beside Bombsite B is the CT as well as the B Stairs that lead down to the basement.
Trying to defend Bombsite B can be slow because Attackers cannot Rush B easily as they could with Bombsite A. Your best course of action here would be to lob a Molotov towards the entrance of B Main and then quickly scope the different angles to see what their movements are. If you can’t see anyone, then climb up the wooden panel beside the stairs to try and pick off any enemy that is trying to pull through. This means that you will be holding the B Main entrance, which will mean the enemy has to take an alternative route where your teammates can ambush them.
You might also try to be a little more aggressive and rush down, take cover under the stairway after you’ve gained some time by the Molotov. This is one of the most helpful angles on the Vertigo Map and it’s hard for the attackers to notice while entering B Main.
You will find that attacking Bombsite B on this map is tough if you don’t manage to have perfect coordination with your team. If you try to do it alone, the chances are that it will lead to failure. It’s more difficult to Execute B on Vertigo because the enemy will have the advantage of high ground. Having said that, there are some excellent tricks that you can pull off with your team to complete a clean and quick B Execute.
Use Promo Code WELCOME for a 100% deposit bonus.
100% first deposit bonus which means that we will add an extra 100% to the amount you deposit into your player account. The maximum amount for the bonus is €550 and the rollover requirement is x10 for betting and x30 for casino (qualified deposited amount + bonus).
The first thing to remember when trying to attack Site B on the map is to make sure you have plenty of flashbangs, smokes and Molotovs. You can try to block your enemy’s vision whilst allowing your team full vision.
In an ideal world, you would send one player to secure Min, with the others bombarding the top floor with Molotovs and smokes, using the short amount of time available to ascend the stairs and take out your opponents. If your coordination is solid, you can take out Bombsite B quickly and cleanly.
The CT Spawn on this map is the closest to the B Site area. This can offer players quick access to defend the location. This is where the Counter-Terrorists spawn and they only need to get through the CT door and the right door to get access to Bombsite B – also found on the top floor of the Vertigo map.
This CT Spawn also allows quick access to Bombsite A. It offers the Defenders the chance to follow the path through CT Mid, then through the Back in order to see Bombsite A. Whatever the case, Misd is the most simple area to control from the CT Spawn, as the Defenders spawn more closely to this location. Additionally, there is a ladder beside the CT Spawn that could be used to flank Attackers, given the fact that they spawn on the floor below.
The T Spawn (Terrorists Spawn) can be found on the lower floor and it features a wide spread out area that offers a couple of routes for an attacker to choose from. The attacking side can reach T-Mid, then, from there, they can get to Mid quite quickly after they spawn. They can then try to secure the area as this is vital to gain control of. From this point, T Side can rush Bombsite B quickly and attempt to ascend the stairs to secure this area.
In addition, T Spawn also offers quick access to Bombsite A, which will force attackers to run through T Lower as well as Connector, the Bridge and then to the Ramp to get to Bombsite A. An interesting thing to note about the Vertigo Map is the fact that there’s a ladder connecting CT Spawn and T Spawn, which provides plenty of opportunities for flanks, sneak attacks and numerous surprises.
Use Promo Code WELCOME for a 100% deposit bonus.
100% first deposit bonus which means that we will add an extra 100% to the amount you deposit into your player account. The maximum amount for the bonus is €550 and the rollover requirement is x10 for betting and x30 for casino (qualified deposited amount + bonus).
The Ramp is a hugely important location on the Vertigo map for both sides. This is because Attackers are able to use it to get to Site A quickly and plant the bomb. This means that the Defenders will also look to rush there in order to stop the attackers from simply being able to slide through and plant the bomb with no barriers or issues.
You can find the Ramp next to Bombsite A, and there are plenty of big and vicious fights that can happen here. However, these fights can start and end very quickly given the fact that this is such a wide-open area which makes it hard to find cover.
If you are an Attacker and are heading through the Bridge towards the Ramp then watch out above as Defenders can shoot you through the wooden floor.
On the map, there are three different choke points. All three are stairways that allow you to travel between the two floors. The map callouts for the three choke points are:
T Stairs – which are located at the T Spawn area
B Stairs, which are located at Site B
A Ramp, which is located close to Site A
All three locations are dangerous and hold a number of risks of ambush and attack. There are numerous angles from which you can be killed without even noticing the enemy is there. As such, it’s best to constantly be on guard whenever you are coming to one of these choke points. Either try to flush out the enemy with a grenade or Molotov or else use a smoke grenade to block their vision.
Use Promo Code WELCOME for a 100% deposit bonus.
100% first deposit bonus which means that we will add an extra 100% to the amount you deposit into your player account. The maximum amount for the bonus is €550 and the rollover requirement is x10 for betting and x30 for casino (qualified deposited amount + bonus).
So, you know the basics of the Vertigo Map, now it’s time to practice, become a master, and move on to the next map!
In the fast-paced world of competitive gaming, every millisecond counts. Whether you're a seasoned Counter-Strike…

In a thrilling display of skill, strategy, and teamwork, the Gamers8 CS:GO 2023 tournament has…